
Showing posts with label Breakfast Foods. Show all posts
Showing posts with label Breakfast Foods. Show all posts
Tuesday, March 28, 2017
Gluten Free Graham Crackers

Monday, January 25, 2016
Oatmeal White Chocolate Chip and Craisin Muffins
I know, I know. Posting once a year is not really sufficient to make people think that I really intend to maintain this blog. Two words: Seven Children. So, sorry and all that, but the lack of posts will probably continue (though I would like to TRY to be better ... but we'll have to see how that actually works out).
I've been craving muffins recently. My brother was here for Christmas and he bought some huge muffins at Costco and then left several of them in my freezer when he returned to Hawaii. I tried to eat one the other day. It was ... not yummy. So I decided that I would just make muffins several times a week until I don't want them anymore.
First I made Lemon Raspberry Muffins (which were fabulous ... maybe that will be my next post). Two days afterward I decided I wanted something a little heartier, so I googled oatmeal muffin recipes. I tried one from the Food Network (making several adjustments, additions, and deletions because that's the way I tend to cook). They were really good, but I realized afterward that I had accidentally doubled all the ingredients except for the sugar. So I made them again this morning. Just now, as I thought about it, I realized that I used one more egg this morning than I did last time. I'm not really sure which version I liked best ... So I'm posting both. Try them and then let me know which is your favorite!
 |
| Full Sugar Version |
 |
| Low Sugar/Fewer Eggs Version |
Thursday, March 29, 2012
Orange Rolls

1 1/2 Tbs. yeast
1 1/2 Tbs. sugar
3/4 c. warm water
1 c. scalded milk
1/2 c. sugar
6 Tbs. butter
1 tsp salt
1 tsp vinegar
3 c. GF mix
1 Tbs. xanthan gum
3 eggs
1/4 c. margarine, melted
Filling:
1 c. granulate sugar
4 tsp freshly grated orange peel
Orange glaze:
1/3 c powdered sugar
1 Tbs orange juice concentrate
3 Tbs water
In a small bowl combine yeast, 1 1/2 Tbs. sugar, and water. Set aside.
Add butter to the scalded milk and let melt while milk cools. In the bowl of a stand mixer, beat eggs well. Stir the cooled milk mixture and add to the eggs. Add salt and vinegar. Add foamy yeast mixture. Slowly stir in xanthan gum and GF mix. The dough will be very sticky. Cover the bowl with plastic wrap and let it sit in the fridge overnight. (Don't try to skip this step. The dough needs to sit overnight, or it just doesn't work right. We know. We've tried!)
Dust the surface of a sheet of waxed paper with GF mix, making sure it is covered completely. Place half the dough onto the paper. Dust the top of the dough with enough GF mix to keep the rolling pin from sticking. Roll the dough into a long rectangle, approximately 6x18 inches. (If necessary add more flour underneath or on top.)
Combine all filling ingredients. Brush the top of the rectangle of dough with melted butter and spread filling generously onto rectangle.

Starting at one of the long sides, roll up the dough and cut into 1 1/2" slices. Place slices on a well-greased baking sheet. Repeat with other half of dough.

Preheat oven to 350 degrees. Let rolls rise 20-25 minutes. Bake for 20-25 minutes. Glaze or frost as desired. Store in an airtight container to keep moist.

Tuesday, January 31, 2012
Pop-Tarts

My neighbor called me up a couple of days ago and said she had been watching a cooking show and they were making pop-tarts. My first thought was "who would want to make pop-tarts? They aren't even that good." My next thought was "I bet I could make pop-tarts." And then I found myself making pop-tarts. I filled them with raspberry jam simply because that is what I had on my shelf, and because strawberry jam with cream cheese frosting on top, sounded really yummy. The tarts were actually easier than I expected, and when I tasted them I thought to myself, "I love pop-tarts!"
pop-tart crust
This is just our basic pie crust, rolled thin and cut into rectangles.
2 c. GF all purpose flour mix
1/2 tsp. xanthan gum
2 Tbs. sugar
1/2 tsp. salt
6 oz. Cream cheese
1 c. real butter (or I used I can't Believe It's Not Butter)
Cream all ingredients together.
Refrigerate for 30 minutes- 1 hour.
The dough will be sticky.
On a clean surface sprinkle some flour down. Roll the dough out just like a normal pie crust. Cut into rectangles and place on a greased cookie sheet.

Place a scoop of thick jam or jelly onto the middle of the pastry square. Place a second square on top of the jam and press down around the edges to seal the jam inside the shell. Using a fork press down around the outside of the tart, and then using the same fork poke holes in the top of the pastry.

Bake at 350 for 20 minutes. Cool and frost with cream cheese frosting.
Frosting
8 oz. cream cheese
1/2 c. margarine
1 lb. powdered sugar (about 3 cups, I think)
1 tsp. vanilla
Thoroughly blend cream cheese and margarine. Slowly beat in powdered sugar. Add vanilla and beat until combined. Store in the refrigerator.
Alternate fillings: chocolate chips, Nutella, cinnamon and sugar.

Friday, December 23, 2011
Pumpkin Bread

I have been thinking about what kind of treats I should make for neighborhood gifts this Christmas. I intended to give away English Toffee, but I started making it too early and ate it all. (The kids helped, of course.) Then, while walking around Costco, I sampled some pumpkin bread. My GF girls were offended that they couldn't have some, so I decided that I would make a gluten free version for them. It turned out so well that I've promoted it to "Chief Neighborhood Treat Plate Filler". Good name, huh?
I had initially intended to use my banana bread recipe and just use pumpkin instead of bananas (plus add some of the right kind of pumpkin appropriate spices). But when I started looking at pumpkin bread recipes online, I realized that they all had at least TWICE as much sugar as my banana bread and a lot more oil. I suppose that the reason for the extra sugar is because pumpkin is nowhere near as sweet as over-ripe bananas. I wasn't sure about the extra oil, but I decided it might have a good reason, too. So I took an online recipe, changed several things (used GF flours, changed the spices to match MY ideas of good pumpkin spices, etc), and baked away. The Costco version was covered with Cream Cheese Frosting. I haven't added frosting to mine because it's so darn good without it! (I must admit that my children have been having a heyday with the Nutella, though. Evidently they believe that chocolate hazelnut butter is the best accompaniment to pumpkin things ever invented. And I haven't really argued too much about it. Who could?)
Pumpkin Bread
3 cups canned pumpkin puree (practically a full 29 oz. can)
1 1/2 cups vegetable oil
4 cups white sugar
6 eggs
5 cups EGF all-purpose flour
2 tsp. xanthan gum
1 1/2 tsp. baking powder
1 1/2 tsp. baking soda
1 1/2 tsp. salt
4 tsp. ground cinnamon
1 1/2 teaspoons ground cloves
1 1/2 tsp. ground ginger
1/2 tsp. mace
Preheat oven to 350 degrees. Grease 4 9x5 loaf pans. (I actually did 3 9x5 pans and then 2 4x3 pans.)
Combine pumpkin, oil, sugar, and eggs. Mix well.
In another bowl mix together the rest of the ingredients. Add to the pumpkin mixture and blend until well combined. Divide batter evenly between the prepared pans.
Bake at 350 for about 60 minutes. (The top should spring back when lightly touched, and a cake tester inserted into the thickest part of the loaf should come out clean.)
Cool. Enjoy!
Friday, November 4, 2011
Bagels

These are really good with vegetable garden cream cheese or plain cream cheese and jam. The trick is to not let them rise at all and to make sure that you add more water as it boils down; otherwise they taste like baking soda. This dough also works amazingly well for calzones or bagel pizzas. Yum!
Bagels
4 ½ c. EGF All-Purpose Flour
1 Tbs. sugar
2 tsp. salt
¾ tsp. xanthan gum
1 ½ tsp. yeast
1 ½ c. warm water 1 tsp. rice vinegar
¾ c. Best Foods mayonnaise
10 c. boiling water
½ c. baking soda
2 large egg yolks, beaten
Preheat oven to 425°.
In a large mixing bowl, combine flour, sugar, salt, and xanthan gum; mix well. Add yeast to the top of the dry ingredients, but don’t mix in.
Pour warm water on top of the yeast and let it sit for 30 seconds. Mix on low speed until blended. Add vinegar and mayonnaise. Beat for 2–3 minutes on high speed.
Roll dough into snake-like forms, connecting the ends to form a thick bagel-shaped circle.
In a large pan, boil water and baking soda. Immediately place shaped dough in boiling water for 30 seconds, then remove it and place it on a greased cookie sheet. Brush with beaten egg yolk.
Place bagels in preheated oven and bake for 12 minutes. Store in a Ziploc bag in your fridge or freezer. Reheat individually in the microwave for 20 seconds.
Variations: Add ½ c. blueberries or ¼ c. ground sundried tomatoes to the dough before baking, or try sprinkling cinnamon and sugar on the bagels once they are baked, or topping them with grated cheese.
Happy Cooking!
Wednesday, September 14, 2011
Cinnamon Sugar Oat Crackers

Now that school is back in session, I'm working on making varied gluten free lunches. There are definite benefits to having my gluten free kids bring lunches from home; I know that they are getting food that tastes good, and I know that their food is truly gluten free and hasn't been cross contaminated by a poorly trained cafeteria worker. On the other hand, I do have to spend some time coming up with interesting lunch variations so they don't get bored to death with the same old same old.
When I was younger, my mother would put cream cheese frosting on graham crackers and pack them in our lunches. I decided that I would do the same for my kids . . . though it's really more of a "based on a true story" movie than a documentary. (Did that metaphor make sense? It did in my head, but now that it's out on the page it seems a little odd. Ah, well.)
So I decided to take my oat biscuit dough (which I usually have in my fridge), roll it out thin, make cinnamon-sugary crackers out of it, slap frosting on/between them, and send them off to school with them. And . . . it works! (Of course it does, don't be ridiculous.) So now I will share with you the very complex and tricky recipe for these delicious treats. Enjoy!
Cinnamon Sugar Oat Crackers
1/3 c. oat biscuit dough
3 Tbs. butter, melted
1/2 c. brown sugar
1/2 tsp. cinnamon
Preheat oven to 350 degrees.
Roll biscuit dough out very thinly. (If the dough has been in the refrigerator, you may want to microwave it for 10 seconds or so in order to make it easy to roll it out.) Spread the melted butter over the surface of the dough.
In a small bowl (or ziplock bag), combine the brown sugar and cinnamon. Sprinkle the cinnamon sugar mixture on the butter. (You won't need to use all the cinnamon sugar. Save the rest for another day.)

Use a pizza cutter (or a knife, if you insist) to cut the dough into whatever size of crackers you'd like.
Bake for 10 - 15 minutes, until cracker edges are browned and crackers are crispy. Remove from oven and cool completely. Frost with Cream Cheese Frosting or eat plain.
Wednesday, July 20, 2011
Blender Pancakes with Berry Syrup

Hello, again! Long time no see. I've been family reunioning and recuperating from family reunioning for the last several weeks. As you will no doubt have realized, I haven't been posting anything. I thought about going in and typing up several posts and fiddling with the posting dates so it would LOOK as though I had been posting things, but I decided that I just couldn't stoop to that kind of subterfuge. Besides, that would mean that I would have to type up lots of recipes, and I just wasn't feeling it. So instead I'm just going to say: "Vacation was fun!" and start working on being reliable again.
This is a recipe that my mother-in-law makes with whole wheat. When we got home I tried it with gluten free whole oats (also knows as oat groats), and they were just as yummy. Let me know what you think!
Blender Pancakes
2 c. milk
1 1/3 c. whole oats*
2 eggs
3/4 c. oil
2 Tbs. sugar
1 tsp. baking soda
1 tsp. baking powder
1 tsp. salt
1/4 tsp. xanthan gum
Place oats and milk in a blender. Blend on medium high speed for 4 minutes. Add the rest of the ingredients and blend on high speed until combined. Bake on a 350 degree griddle. Serve with Berry Syrup and whipped cream.**
*I have used gluten free rolled oats instead, but the texture wasn't quite the same. They baked differently. I'm going to keep experimenting, though, because the gf rolled oats are much easier to find than the whole oats.
**I actually use cool whip 'cause it's faster.
Berry Syrup
2 c. frozen berries (I used a Triple Berry Blend from Costco)
1 Tbs. lemon juice
2 Tbs. water
2 Tbs. sugar
1 dash cinnamon
Combine all ingredients in a small saucepan. Bring to a boil over medium high heat, stirring occasionally. Remove from heat. Blend with a stick blender or regular blender.
Wednesday, June 8, 2011
Crepes

It's summer!!!
What better way to celebrate than making, and especially eating, crepes! My children love to fill them with whipping cream and strawberries. My husband likes them with bananas and chocolate. With this recipe, how you serve them is up to you. Happy Cooking!
Crepes
3 c. milk
6 eggs
1 Tbs. melted butter or oil
1 tsp. salt
½ tsp. xanthan gum
1 c. Featherlight mix
½ c. GF mix
In a large bowl, beat milk, eggs, and melted butter until smooth. Slowly add salt, xanthan gum and flours. Mix until the batter is the consistency of heavy cream.
Heat a 6-inch crepe pan or a non-stick frying pan on medium heat. (If your pan is older, it sometimes helps to spray it with non-stick cooking spray.) Spoon 2 to 4 tablespoons of batter into the bottom of the pan. Move pan from side to side to coat bottom.
Brown the crepe on one side and then flip with a spatula and brown the other side. Keep warm in the oven. Serve with your favorite toppings.
These can be frozen to use later. Thaw overnight in the refrigerator.
Makes approximately 15 crepes.
Topping Ideas: whipped cream, any fresh fruit, cinnamon and sugar, syrup, butter, chicken, sausage and eggs, tomatoes and bacon, powdered sugar, hard boiled eggs, cream cheese and jam.
Wednesday, April 20, 2011
Banana Muffins

Did you miss me last week? I am currently recovering from the aftereffects of a Spring Break jaunt to Washington State. It was a lovely trip, but bookended by 12 hour drives with 5 young girls (which inevitably means a bajillion potty breaks). There are still a couple of unpacked suitcases scattered around the house because the older girls are supposed to unpack their own clothes and I haven't yet begun to breathe down their necks about it. Tonight, my pretties! The end of suitcase procrastination is nigh!
Speaking of procrastination . . . I didn't post a recipe during Spring Break (which I feel was practically justifiable), and here it is Wednesday and I still haven't posted one for this week either. I feel (almost) guilty, and will repair the omission at once. This recipe was modified by my brother-in-law, then my mother-in-law, then myself. (I love hand-me-down recipes!) They are my absolute favorite banana muffins, and (thanks to Spring Break) I have some overripe bananas sitting on the counter just waiting to be muffinized. (Also some not-quite-bad milk that needs to be used in frozen waffles.) Baking time today!
Banana Muffins
1 c. butter
2 c. sugar
2 eggs
2 c. mashed bananas
2 tsp. baking soda
3 tsp. cinnamon
1 tsp. allspice
1 tsp. cloves
1 tsp. salt
4 c. EGF All-Purpose Flour Mix
2 tsp. xanthan gum
Preheat oven to 350°. Grease (or line with paper liners) 2 muffin pans.
Cream butter and sugar; add eggs and blend well. Mix in mashed bananas.
In another bowl combine the dry ingredients, then add them to the banana mixture. Mix until well blended.
Fill muffin cups ½ - ⅔ full. Bake for 25 -30 minutes.*
*Mini-muffins will only need to bake for about 15 minutes.
Monday, February 28, 2011
Biscuit Coffee Cakes

When I was in 6th grade, I took a couple of cooking classes. Those classes taught me a number of important things. First of all, never never never cook with expired clams. Secondly, seaweed is a comestible (I refuse to call it food) that I do not want to eat again. Finally, refrigerator biscuits dipped in butter and brown sugar taste really good.
While gluten free refrigerator biscuits do not, to my knowledge, exist, the good news is that I have found a gluten free biscuit recipe that I love and which works just as well. My sister and her husband created this recipe after she discovered that she is allergic to rice. Until I tasted these, I had resigned myself to the fact that I was always going to hate gluten free biscuits. They never had the right texture or flavor, and I had mostly given up trying. Since my sister shared these with me, though, I've begun to make biscuits about once a week. They're not only quick and easy, but they taste wonderful!
Mette's Oat Biscuits (and Betsy's Biscuit Coffee Cakes)
1 1/2 c. GF Oat Flour*
1 c. cornstarch
3/4 c. tapioca starch
1/4 c. potato starch
2 Tbs. potato flour
2 tsp. xanthan gum
2 Tbs. baking powder
2 tsp. baking soda
1 tsp. salt
1/4 c. sugar
6 Tbs. butter flavored shortening
6 Tbs. butter or margarine
1 1/4 c. milk (or dairy free substitute)
Preheat oven to 350°.
Place dry ingredients in a large bowl. Add shortening and butter. Mix on medium speed until shortening is blended in. (Mixture will look like small crumbs.) Add milk. Mix until well combined. Let sit for a couple of minutes. Gather dough into a ball.**
Press some of the biscuit dough out on a flat piece of parchment paper (or a lightly floured*** surface) about 1/4" to 1/2" thick. Cut with a biscuit cutter. Place on a cookie sheet. Bake for 10 - 12 minutes or until doubled in size and lightly browned.
To make Biscuit Coffee Cakes, cut out biscuits as directed above. Dip both sides of each biscuit in melted butter. Place each biscuit face down in brown sugar, then place the biscuits brown-sugar-side up on a baking sheet or pie plate. (The biscuits may be placed touching each other or with space between them.) Bake for about 15 minutes.
*I make this at home by taking my gluten free oats (which cost $3.00 a pound, unfortunately) and grinding them finely in a blender. I really like them to be ground very finely, but you can leave some slightly larger bits if you'd like.
**These biscuits taste best fresh, but the unused dough can be stored in the refrigerator for up to a week. So place leftover dough in a Ziploc bag, seal it tightly, throw it in your fridge, and make biscuits in moments any day of the week. Refrigerator biscuits ahoy!
***I'd use featherlight mix or cornstarch. Well, actually, I'd use parchment paper cause it's really easy to clean up, but I think that featherlight or cornstarch would work the best if you want to choose the "lightly floured surface" route.
Tuesday, January 18, 2011
Pumpkin Muffins
I needed something to make with the extra pumpkin I had in the fridge, and since it was close to Halloween I decided on pumpkin muffins. It took several tries to get these right, but I eventually did and they are yummy. – Kirsti
Pumpkin Muffins
½ c. butter or margarine
1 c. granulated sugar
2 large eggs
1 tsp. vanilla
1 ½ c. canned pumpkin
2 tsp. baking powder
¼ tsp. salt
¾ tsp. xanthan gum
½ c. sour cream
2 c. EGF All-Purpose Flour*
1¼ tsp. ground cinnamon
½ tsp. ground ginger
¼ tsp. ground nutmeg
¼ tsp. ground cloves
Chocolate chips (optional)
½ c. milk
Preheat oven to 375°.
Grease muffin pans (12–18 regular or 24 mini muffins).
Using an electric mixer, whip the butter until creamy. Add the sugar, and beat until pale and fluffy. Add eggs one at a time, beating well after each. Mix in pumpkin, vanilla, baking powder, salt, xanthan gum, sour cream, and spices. Alternately add flour and milk, mixing well after each addition.
Bake 15–20 minutes for mini muffins and 25–30 minutes for regular muffins.
* Make this by combining 1 1/2 c. featherlight mix and 1/2 c. GF mix.
Pumpkin Muffins
½ c. butter or margarine
1 c. granulated sugar
2 large eggs
1 tsp. vanilla
1 ½ c. canned pumpkin
2 tsp. baking powder
¼ tsp. salt
¾ tsp. xanthan gum
½ c. sour cream
2 c. EGF All-Purpose Flour*
1¼ tsp. ground cinnamon
½ tsp. ground ginger
¼ tsp. ground nutmeg
¼ tsp. ground cloves
Chocolate chips (optional)
½ c. milk
Preheat oven to 375°.
Grease muffin pans (12–18 regular or 24 mini muffins).
Using an electric mixer, whip the butter until creamy. Add the sugar, and beat until pale and fluffy. Add eggs one at a time, beating well after each. Mix in pumpkin, vanilla, baking powder, salt, xanthan gum, sour cream, and spices. Alternately add flour and milk, mixing well after each addition.
Bake 15–20 minutes for mini muffins and 25–30 minutes for regular muffins.
* Make this by combining 1 1/2 c. featherlight mix and 1/2 c. GF mix.
Saturday, October 16, 2010
French Toast . . . 'cause I made bread yesterday!

While french toast isn't a terribly difficult thing to make gluten free, a recipe can't hurt, right? So, here goes:
French Toast
1 egg
2 tsp. oil
2 dashes cinnamon
2 tsp. milk
2 - 3 pieces gluten free bread
Combine egg, oil, and cinnamon. Mix well. (I once had a college roommate who just swirled her eggs a bit with a fork, which I think is just sick and wrong. So, too, did she, and she consequently hated french toast . . . until I made it for her and beat the eggs until they were well incorporated. Suddenly french toast was much more appealing!) Mix milk into the egg mixture. (You don't need a lot of milk - too much will prevent the egg mixture from browning well - but a little splash of milk prevents a fried-egg-on-toast flavor.)
Dip each piece of bread briefly in the egg mixture, turning once to coat both sides. Place on a hot griddle (about 375 degrees, if you have an electric one). Cook until golden brown, then flip and cook the other side.
Serve with powdered sugar, jam, or syrup.
French Toast
1 egg
2 tsp. oil
2 dashes cinnamon
2 tsp. milk
2 - 3 pieces gluten free bread
Combine egg, oil, and cinnamon. Mix well. (I once had a college roommate who just swirled her eggs a bit with a fork, which I think is just sick and wrong. So, too, did she, and she consequently hated french toast . . . until I made it for her and beat the eggs until they were well incorporated. Suddenly french toast was much more appealing!) Mix milk into the egg mixture. (You don't need a lot of milk - too much will prevent the egg mixture from browning well - but a little splash of milk prevents a fried-egg-on-toast flavor.)
Dip each piece of bread briefly in the egg mixture, turning once to coat both sides. Place on a hot griddle (about 375 degrees, if you have an electric one). Cook until golden brown, then flip and cook the other side.
Serve with powdered sugar, jam, or syrup.
Thursday, April 8, 2010
Puffy Oven Pancake

This morning's Special Request was Puffy Oven Pancake. This is one of my family's favorite special breakfasts. I especially like the higher protein content provided by the eggs and nuts, which means that I feel full for longer than half an hour. This recipe really works best with Featherlight mix. I've tried it with other flour mixes and just haven't liked it as well. I almost always make a double batch, because my family of 6 easily polishes off two 9x13 pans.
Puffy Oven Pancake
1 c. featherlight mix
1/2 tsp xanthan gum
1/4 c. sugar
1/2 tsp salt
1 c. milk
4 eggs beaten
2 Tbs. margarine or butter
1/4 tsp. cinnamon
1 (16 oz) can sliced peaches, diced
1/4 c. chopped pecans
Heat over to 425 degrees.
Mix together featherlight mix, xanthan gum, sugar, and salt. Combine milk and eggs, and slowly whisk into dry ingredients. (I usually add enough milk/egg mix to form a thick batter, beat it well, then add more milk/egg. This gives me a smooth batter without any lumps.) Place margarine in a 9x13 pan. Melt in hot oven until margarine is sizzling (about 3 minutes). Remove pan from oven. Tilt to spread margarine over the entire bottom of the pan. Immediately pour batter into the hot pan. Sprinkle with cinnamon, then top with diced peaches and pecans.
Return pan to oven. Bake for 16-20 minutes, until golden brown. Pancake puffs up a lot while cooking, but almost always falls once it's out of the oven. Serve with syrup or cream.

This is the pan just before removal from the oven.

This is the same pan, after being removed from the oven. You can see that the edges of the pancake are 1/2 - 1 inch shorter after removal from the oven. It's shorter, but no less yummy!
Wednesday, April 7, 2010
"Cinnamon Roll" Bread
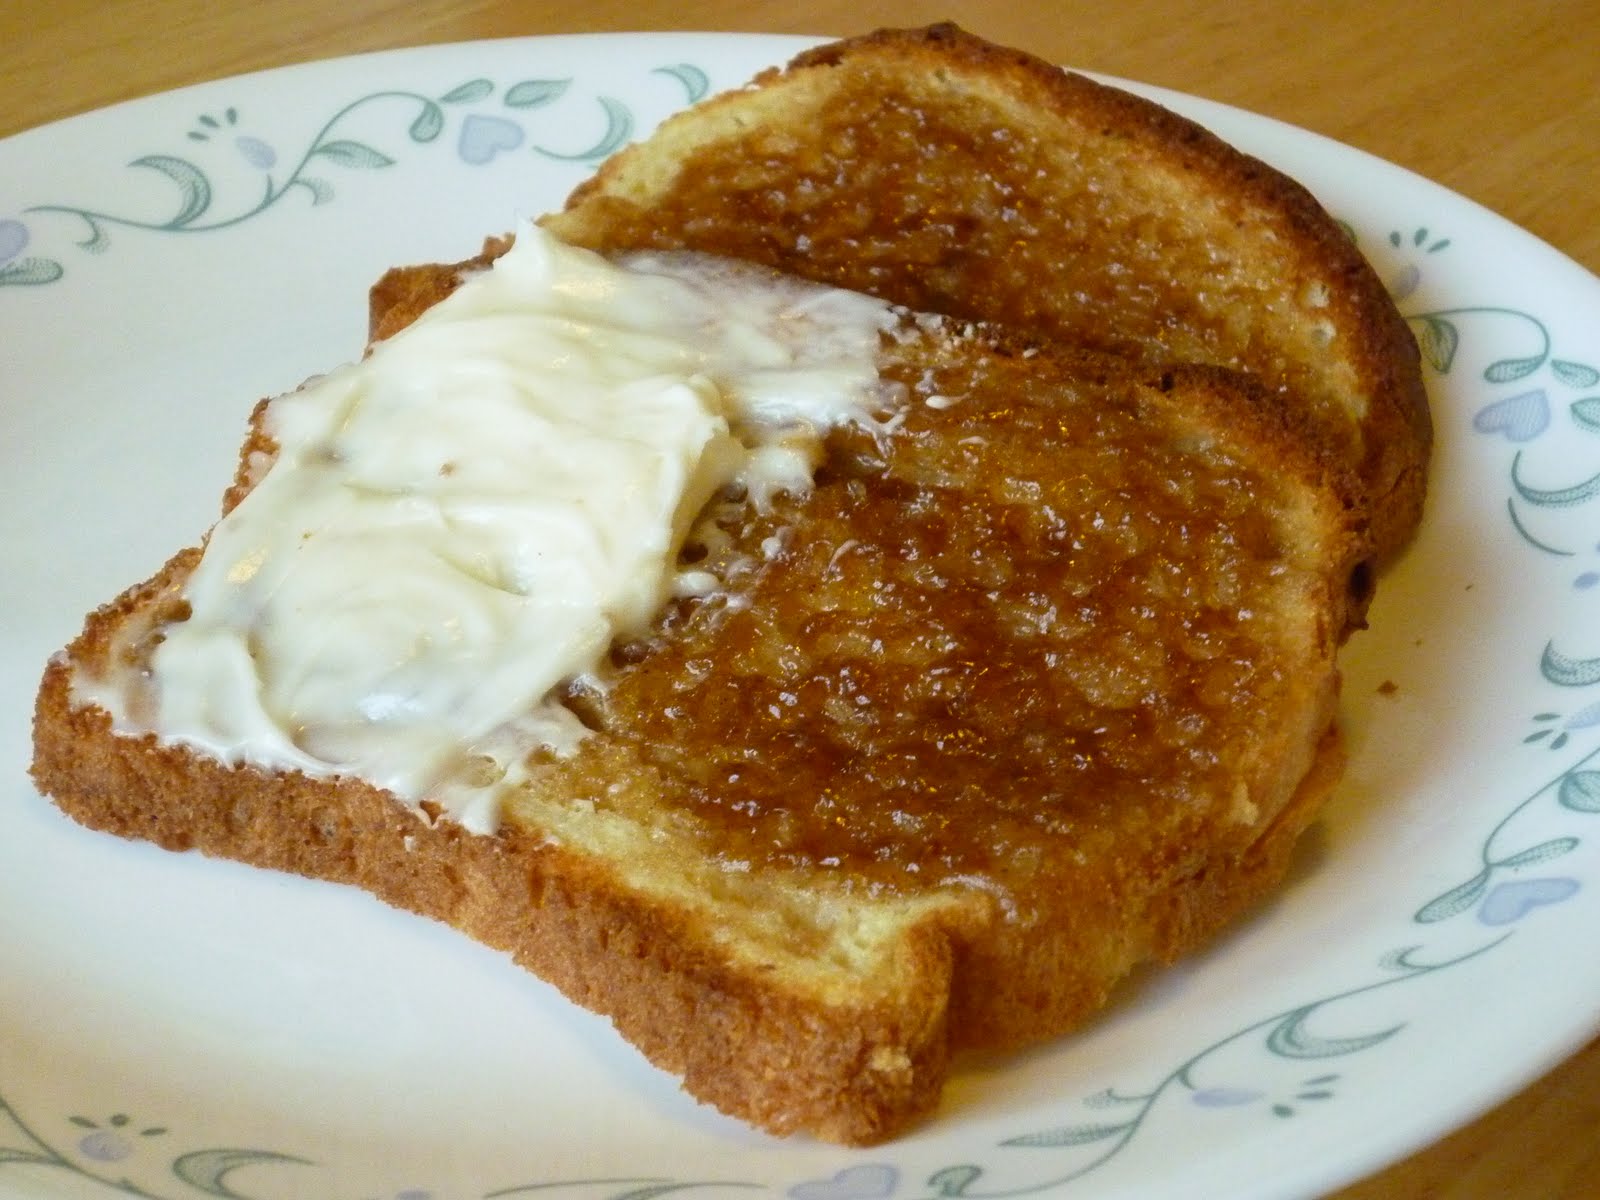
This weekend I was making Sunday Morning Breakfast Cake, one of my mother-in-law's recipes (modified to be gluten free, of course). The topping is a combination of butter, brown sugar, and nuts, and as I was spreading it on the cake, I started to think about cinnamon rolls again. The pull-aparts, while yummy, do require a bit of prep work . . . too much to do on a daily basis. I decided to see if I could create a spreadable "cinnamon roll" topping that could be enjoyed anytime. It doesn't taste exactly like cinnamon rolls (my husband says it's not quite gooey enough), but it is very good. In fact, one of my 5 year olds just came up to me, saw the photo, and said: "Mom, will you make some of that for me again this morning?" Of course I will!
"Cinnamon Roll" Bread
1/2 c. butter or margarine, softened
"Cinnamon Roll" Bread
1/2 c. butter or margarine, softened
1 1/3 c. brown sugar
1 tsp. cinnamon
slices of White Sandwich Bread
cream cheese frosting, optional
Combine butter, brown sugar, and cinnamon. Mix well. (I just used my hands to mix it together, but you could use a mixer.) Spread on slices of bread*. Place topped bread on a cookie sheet, then broil until bubbly. (When using the broiler, don't walk away from the oven. You only need to broil it for 1 - 3 minutes, and you will be happiest if you stay and watch your food the whole time. I'm always immensely irritated with myself when I burn something that would have been delicious if only I'd watched it!)
You can top the bread with cream cheese frosting, if you want, or eat it straight out of the oven. Either way, it's yummy! Keep extra spread in the refrigerator. Microwave cold spread for 10 - 15 seconds to make it spreadable again.
*I always keep my gluten free bread in the fridge or freezer. Then, before using it, I reheat it in the microwave until it's soft and warm. This takes about 10 seconds. Once the bread is reheated, it's as pliable as newly made bread.
Combine butter, brown sugar, and cinnamon. Mix well. (I just used my hands to mix it together, but you could use a mixer.) Spread on slices of bread*. Place topped bread on a cookie sheet, then broil until bubbly. (When using the broiler, don't walk away from the oven. You only need to broil it for 1 - 3 minutes, and you will be happiest if you stay and watch your food the whole time. I'm always immensely irritated with myself when I burn something that would have been delicious if only I'd watched it!)
You can top the bread with cream cheese frosting, if you want, or eat it straight out of the oven. Either way, it's yummy! Keep extra spread in the refrigerator. Microwave cold spread for 10 - 15 seconds to make it spreadable again.
*I always keep my gluten free bread in the fridge or freezer. Then, before using it, I reheat it in the microwave until it's soft and warm. This takes about 10 seconds. Once the bread is reheated, it's as pliable as newly made bread.
Tuesday, April 6, 2010
Pumpkin Pancakes

Pancakes and waffles are one of the first foods I recommend to new gluten free cooks. The batter is easy to make, and they freeze and reheat well. They're great for peanut butter sandwiches, too. Besides which, it's easy to vary the recipe. This particular variation is one that my neighbor shared with me. The ones she brought me were full of wheat, but I was easily able to modify my own pancake recipe to re-create the delicious flavor.
Pumpkin Pancakes
1 1/2 c. Featherlight mix
1/2 c. GF mix
1/2 tsp. xanthan gum
½ tsp. salt
1 Tbs. baking powder
¼ c. sugar
¼ c. brown sugar
1 Tbs. cinnamon
3 dashes mace
3 eggs
1 ¾ c. milk
½ c. oil
1 c. pumpkin
¼ - ½ c. semi-sweet chocolate chips
Combine dry ingredients in a large bowl. In another bowl, combine eggs, milk, oil, and pumpkin. Add to dry ingredients and mix well (there should be few, if any, lumps). Stir in chocolate chips. Cook on a hot griddle until bubbles appear on the surface of the pancakes. Flip and cook on the other side. Leftover pancakes may be refrigerated (or frozen) and reheated in the microwave.

Monday, April 5, 2010
Cinnamon Pull Aparts

First of all . . . you will note the return of pictures! I will not re-tell the camera story now, because I do not have the time to calm myself back down. I will simply say: "Panasonic has NO customer service skills. But I fixed the camera despite them." Sheesh.
So. Spring Break, for me, means time to make fun gluten free breakfast things. I'm going to try to post a fun breakfast recipe every day this week. Considering my track record, though, I make NO guarantees!
About a month ago, I bought a small loaf of cinnamon pull-aparts from a local bakery. I've tried making them gluten free in the past, but the bread batter is so sticky that it was more hassle than it was worth. Well, as I stared at this little loaf of bread, I started thinking about the prepurchased frozen bread dough balls that are sold in grocery stores, and wondered: "Why can't I do that?" Coming up with no good arguments against, I decided to try it. And . . . it worked! One of my 5 year olds helped me make the pull aparts, and there was very little mess to clean up. Definitely a repeater!
Cinnamon Pull Aparts
1/2 a recipe of Gluten Free Bread batter, balled and frozen *
1/2 c. butter or margarine, melted
1 c. white sugar
1 tsp. cinnamon
Combine sugar and cinnamon in a small bowl. Melt butter in another small bowl. Line one large bread pan or several small bread pans with parchment paper. (This keeps the cinnamon sugar from burning onto the pan.) Roll each ball of frozen dough in butter, then in cinnamon sugar. Place into the pan(s). Preheat oven to 350 degrees. Allow pull-aparts to rise while the oven heats. Bake pull-aparts at 350 for about 40 minutes. Top with cream cheese frosting.
Combine sugar and cinnamon in a small bowl. Melt butter in another small bowl. Line one large bread pan or several small bread pans with parchment paper. (This keeps the cinnamon sugar from burning onto the pan.) Roll each ball of frozen dough in butter, then in cinnamon sugar. Place into the pan(s). Preheat oven to 350 degrees. Allow pull-aparts to rise while the oven heats. Bake pull-aparts at 350 for about 40 minutes. Top with cream cheese frosting.
 *Each recipe of my White Sandwich Bread makes 2 loaves of bread. To make pull-aparts, make a batch of bread, but just bake one loaf. Scoop the remaining bread batter onto a parchment-paper-lined cookie sheet using a small cookie scooper or 2 spoons. Stick the cookie sheet in the freezer. You can keep the frozen balls of dough in the freezer for quite a while, though if you want to put off using them for a long time, you might want to transfer them to a re-sealable bag so they don’t freezer burn.
Subscribe to:
Posts (Atom)